Showing posts with label Recipes. Show all posts

Wednesday, March 13, 2013

Chocolate Covered Strawberry Cookies

Girl Scout cookies are amazing, we all know that, but what if you could make Girl Scout cookies even better? I did!!!


Chocolate Covered Strawberry Cookies

Ingredients

 
1/2 bag of semi-sweet chocolate chips

Louisiana strawberries
1 sleeve Trefoil Girl Scout cookies

Directions

1. Prepare your baking sheet with parchment paper, and pull out the cookies so you are all ready to go.

2. Set up a double boiler on your stove.  A double boiler consists of a small pot filled with water, a small bowl set on top.  Put the chocolate in your small bowl and turn the heat to medium.  Slowly stir the chocolate until is melted, it may seize up a bit but just keep slowly stirring.  You don't need to add milk or anything to the chocolate, just keep working it until it melts.  As soon as the chocolate is melted take it off the heat, you don't want it to burn.

3. Use a spoon or spatula and spread a layer of chocolate on top of each cookie.

4.  When all your cookies are covered put the baking sheet in the freezer to allow the chocolate an opportunity cool down and harden.

5.  After 20ish minutes, pull the cookies out!  I'm sure there are fancy ways to cut strawberries so that they are visually appealing, but I'm not fancy.  I just want to eat all the strawberries!!! Slice your strawberries and pile them on top of your cookies.

6.  Eat all the cookies in one sitting (that may have just been the case for me, the roomie, and the roomie's boyfriend).


Picture Tutorial

 
Set up your double boiler on your stove.
 
 
Melt the chocolate slowly (be careful, it will get hot).
 
 
Spread the chocolate on top of the cookies.


Top each cookie with sliced strawberries and enjoy!


A Note on Ingredients

Louisiana strawberries are the best!  If you don't live in Louisiana, get yourself here during strawberry season!  Louisiana strawberries are amazing in a way that I cannot describe, you must get your hands on some!
 

Monday, March 11, 2013

Mine, Nachos

Nachos are super easy, super delicious, and super cheap.  I really don't know why I don't incorporate them into my diet more often.

Last night I made some super tasty nachos for the roomie and I.  Lemme break down my nacho situation for you.

Protein:  Everyone needs some protein in their diet. As a vegetarian, I get my protein from beans, legumes, and leafy greens.  I'm not a huge fan of leafy greens or potatoes on my nachos, so I'm going to stick with beans.  I buy a can of pre-cooked/mashed pinto beans from the grocery store.  Just a can of pre made beans?  How boring you say!  Well, I would agree with you.  Except, that my beans are a little extra special.  I like to kick my nachos up a notch with some spice.  I usually add some chipotle pepper in adobe sauce to my beans.  Or you could add some regular old spices: cumin, cayenne, paprika, salt, pepper, whatever your heart desires.  Last night though, I did something special.  The roommate had made mole the week before, and we still had a bit lying around, so I tossed that in my beans!  And let me say, a wonderful, delicious, semi-accident food choice.

Chip: I like a flat, sturdy chip as my nacho base.  I like to buy Santitas, but last night I was trying to kill off some whole wheat Scoops that have been laying around for forever.  I do not recommend the Scoop chip for nachos, they are wonderful for dips, but do not form a good base for piling upon.

Spicy: Salsa, very basic, very delicious.  4 seeded tomatoes, 1/2 an onion diced, half a bunch of cilantro, juice of 1 lemon, 1 jalapeno half seeded and roughly chopped.  Mix it all up and enjoy! This salsa has a nice balance of sweet and spicy from the tomato and jalapeno.  Last night I didn't have any cilantro, but I did have some mint.  The mint added a nice counter play to the sweetness of the tomatoes and spiciness of the jalapeno.  Adding the mint did make salsa seem more like a fruity salsa, rather than a spicy one.  I'll tell you though, I didn't hate it.

Soothing (Cheese/Guacamole):  Cheese will be the natural soother of any spicy ailments you may have.  I like to use a Mexican/taco blend, but last night had some Monterey Jack/Cheddar blend, really anything will do.  If you are going to vegan route, some nice guacamole will do as well!  Personally, I love guacamole even if I have cheese as well.  Last night's guac was made with: 2 avocados, 1/4 an onion diced, juice of 1 lime, a generous amount of salt.  You could also add some cilantro for added flavor.

Layer and eat away!  I must admit that in the picture below of my nachos, my eyes were a little larger than my stomach.  Too much food on a plate does not denote its deliciousness! 


Serve with a chilled beer, limeade, or other refreshing beverage of your choice!

Friday, March 8, 2013

Pizza Fascination

I have a confession to make.  I LOVE pizza.  I love it so much that I probably eat it at least once a week.  I order it cheap, I order it expensive, I unthaw it from the pizza, I make it from scratch.  I'll pretty much eat pizza any which way.

This is the recipe for a Barbecue Coleslaw Pizza the roommate and I made the other night. 


Barbecue Coleslaw Pizza

Ingredients

Pizza

1 can Pillsbury pizza dough
1 cup pre-made barbecue sauce
1 cup cheddar cheese

Coleslaw

1 head purple cabbage
3 carrots
1/2 cup mayonnaise
1/4 cup Italian dressing
1 tbsp sugar

Directions

1. Cook the pizza dough according to package instructions, about 12 minutes.
2. Top the pizza crust with barbecue sauce and cheese.  Feel free to adjust the amount of each to suit your preference.  Cook the pizza with the toppings for another 8-10 minutes.
3. While the pizza crust is cooking, shred the cabbage and carrots into a large mixing bowl.  Rinse the vegetables.
4.  Mix the mayonnaise, Italian dressing, and sugar together in a separate bowl.  Adjust the seasoning to suit your tastes.
5.  Add the dressing to the cabbage and carrot mixture.
6.  Once the pizza has come out of the oven, top each individual piece with some slaw.


Now, this might sound crazy to you.  But let me just say, it is delicious.  It reminds me of two things from back home.  (1)A local barbecue joint makes a slaw sandwich that basically consists of their homemade barbecue sauce and slaw in a bun.  It is divine, and so delicious when a vegetarian is craving barbecue.  (2)  Another local restaurant from where I am from makes a barbecue salad.  It is a giant bowl regular salad fixings; lettuce, tomatoes, cucumbers, topped with barbecue pulled pork, cheddar cheese, and ranch dressing.
This recipe combines all of that homey goodness with pizza!  I don't know what two things could be better.

Monday, February 18, 2013

Ramen for the Win

 
Y'all.  I have a new love.  A love that most people first experience in high school and becomes deeper and more profound during college.  I have come to this love late in life.  My new love is ramen noodles. 
However, this love is not an all encompassing 'I forgive all of your mistakes' kind of love.  Ramen does have it's low points.  I am willing to look past these few small hindrances and use them to my advantage however.
I have been using ramen in different ways in different recipes the last few weeks and I couldn't be happier with the results. 
I have included the reasons that ramen has become a staple in my pantry and some recipes I have made that have made me over.
 

Reasons why I love ramen noodles:

1. Ramen noodles are super cheap.  I mean, even if you buy the name brand kind they are less than a dollar a package.  If you are super cheap, like me, you may even buy the store brand.
 
2. Ramen noodles are so quick to make.  3-5 minutes and done!  They are the perfect quick meal fixer upper.
 
3. Ramen noodles can be used in so many other ways than a simple boil in water and add salt water packet.
 
4. That 'flavor packet' is horrendous.  It's mostly salt and added chemicals and nastiness.  But who says you have to use that so called 'flavor packet'?  I say no more!  Make your own rules!
 
5. Technically a package of ramen noodles has two servings in it.  By bolstering it up with other ingredients you can easily eat the correct servings without feeling unsatisfied.
 
6. Ramen is vegan!  While I am not a die hard vegan, just a vegetarian, I try to keep my animal product consumption down to 5% daily and every little bit helps!


Ramen Noodle Pad Tai

This recipe is based on a Martha Stewart Recipe, I tweaked it a little bit to suit my own taste.  I added cabbage and carrot because that is what I had in the fridge.  On second thought, I realized I had peas in the freezer, those would have been awesome too.  Feel free to add whatever vegetables you have lying around.  If you aren't of the vegetarian persuasion you could always add in some chicken, steak, or whatever other animal protein you would like!
 

Ingredients

1 package of ramen noodles
1/2 packet of 'flavor'
1 tablespoon soy sauce
2 tablespoons peanut butter
1 tablespoons Sriracha chili sauce (I like my food a little spicy, so feel free to cut back on this)
1 grated carrot
1 handful of shredded cabbage
 

Directions

1.  Cook the ramen according to package directions.
2. Once the ramen is cooked, add 1/2 of the flavor packet (I used chicken flavor)
3. Add the soy sauce, peanut butter, and Sriracha sauce.  Make sure to stir the peanut butter in really well.  If you aren't careful it will just stick to the back of your spoon and not integrate into the sauce.
4.  Add the vegetables to your pad tai.  Continue to stir the vegetables in carefully until the vegetables are wilted to your preference.


Asian Cabbage Salad

This is based off a pinterest recipe I found a few weeks ago.  Fair warning, this makes a ton of salad.  If you cook for one, as I do, you'll be eating on this for a while.  Cut down on the portions to make it fit your lifestyle.

Ingredients

1 head of cabbage, shredded
2 grated carrots
1/2 cup craisins
1 package broken ramen noodles
1/4 cup slivered almonds
1/4 cup sunflower seeds
Asian dressing to you taste
 

Directions

1. Preheat the oven to 350 degrees.  Layer the almonds, broken ramen noodles, and sunflower seeds
on a baking sheet and roast them for 10-15 minutes, depending on the strength of your oven.
2. Toss the vegetables together with the dressing and toasted toppings.
3. Enjoy!


Monday, December 17, 2012

African Peanut Stew

This recipe came from the December issue of Clean Eating Magazine.  If you are looking for healthy, budget friendly, delicious recipes you should really check out Clean Eating.  Most of their recipes are not vegetarian, but focus on lean meats with lots of protein and healthy fats.  If you are vegetarian, a lot of the recipes can be easily modified to fit your lifestyle.


I was a little skeptical when I started this recipe.  As you will see from the ingredients, they aren't items that usually go together.  However, it was awesome!!!!  Even the omnivore roommate was singing it's praises.  It's perfect for the winter season.  This stew is warm, slightly sweet, spicy, and chock full of delicious and nutritious vegetables.  

African Peanut Stew

Ingredients

2 cups brown rice
1 tbsp cooking oil (sunflower, olive, canola, peanut)
2 yellow onions diced thickly
6 cloves of garlic, minced
3 jalapeno chili peppers, seeded and chopped  (I only used two, because they only had giant peppers at the grocery store)
2 tbsp curry powder (Apparently I don't have any curry powder.  Oops.  Instead I used equal parts of chili powder, paprika, and cayenne)
1 tbsp minced fresh ginger
4 cups low sodium veggie broth
2 cups boxed or jarred chopped/diced tomatoes with juices
1/3 cup smooth or chunky peanut butter
1 3/4 lbs sweet potatoes, diced into 1 inch squares
4 cups shredded green or red Swiss chard
sea salt to taste
1/3 cup chopped fresh cilantro

Directions

1. Cook rice according to package directions, cover and set aside.

2. In a stock pot heat oil on medium.  Add onions and saute, stirring occasionally, until tender, 5 to 7 minutes.  Add garlic, jalapenos, curry powder (or other spices), ginger and saute for 1 more minute.

3. Stir in broth, tomatoes and peanut butter (wear an apron or clothes you don't mind getting messy, I got tomato juice all over myself).  Add potatoes and chard and increase heat to medium high.  Bring to a boil, then reduce heat to a simmer and cook until potatoes and chard are tender, uncovered, 12 to 14 minutes.  Season with salt.

4. Divide rice among serving bowls.  Top with stew and cilantro.


Y'all this was so good! I didn't even mind eating it everyday for lunch.  It was that good!  

Let me know what you think of it!

Wednesday, December 5, 2012

Buffalo Cauliflower Bites

One of the foods I miss the most since I have become a vegetarian is buffalo chicken wings.  I LOVE buffalo flavored food and every since heading down the veggie road I have been searching for a recipe to satisfy my buffalo cravings.


I've found it!  This recipe of Spicy Buffalo Cauliflower is the closest I have come to finding a satisfying buffalo chicken wing substitute.  It comes from Amazing Pinterest World and it was so good!  So good that I didn't actually get any pictures of my version...oops!  I swear, the roommate and I gobbled up most of it before I had a chance to photograph it myself.

That being said, this was super easy and super delicious.  It's vegan too!  Can't get any better than that! 

Tuesday, December 4, 2012

Greasy Sae Soup

Last year a group of friends and I started a supper club based on the principles of Iron Chef.  Every Tuesday we would get together to watch Chopped on Food Network.  (Can you tell we love food, love to eat, and love to read/watch things about eating?)  There would either be a theme or ingredient that everyone had to incorporate into their dish.

It was great for us because most of us were recent college graduates and almost no idea what we were doing in the kitchen.  It also fueled our creativity and forced us to think outside of the culinary box week after week.

Around the time the Hunger Games was released into theatres, we are all huge fans, we decided to have a Hunger Games themed supper club.  Everyone brought amazing dishes to the table, it was one of our most successful nights. 

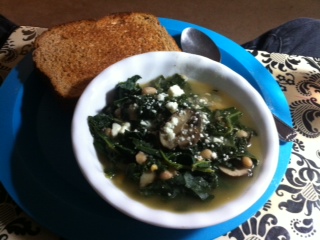
My contribution was Greasy Sae Soup.  It's not really called Greasy Sae Soup, the original recipe comes from My Recipes and is a Tuscan Kale, White Bean, and Ciabatta Soup.  The first time I made this recipe I went straight by the book.  I saw some ways I could improve upon it for my own tastes. 

Since that first supper club I have made this several times.  It is so easy, and so delicious.  As everything simmers together there is a wonderful earthy taste and texture that gets going.  I always think I'll have enough to freeze, never happens!  It's so good I end up eating the whole pot in just a few days. I hope you enjoy it as much as I do.

And so, I present to you:

Greasy Sae Soup

Ingredients

1 can white beans, drained
1 1/2 cups sliced mushrooms (I use cremini mushrooms, but feel free to choose whatever you prefer)
2-2 1/2 qts veggie broth
10 garlic cloves, minced
10 fresh sage leaves
1/2 tsp red chili flakes
1/2 tsp kosher salt
2 bunches kale, rinsed chopped
1 tblsp fresh rosemary, chopped
2 tsp capers
1 tsp pepper

Directions

1. Place broth, beans, garlic, salt, pepper, garlic cloves, sage, and chili flakes into a stock pot.  Bring to a boil then reduce heat.

2. Add the mushrooms and simmer for 20 minutes.

3. After the 20 minutes have passed, add the capers and kale.  Add the kale a handful at a time.  If you put both bunches in at once it will be quite overwhelming and you won't be able to stir it at all.  Once you've placed a handful of kale in the pot, spoon the broth over the kale to begin to wilt it.  As the kale wilts it will get smaller and you can continue to add more and more. Once kale has all been added, simmer for another 15-20 minutes.  The second simmer is to get the kale wilted down to a size and texture you like.

4. Once the kale has wilted down as far as you would like it to go, turn off the heat and serve!  You can add more salt and pepper at this point to suit your taste level.  You can also add either Parmesan cheese or feta to each individual serving dish.  I don't (I'm trying to stay as vegan as possible with my home cooking) and I don't miss it at all; but do as you wish!

This soup is served best hot with some crusty bread on the side.  As you can see from the picture, I didn't have any crusty bread, toast had to do.  Such a lovely end to a rainy and dreary day!

Saturday, December 1, 2012

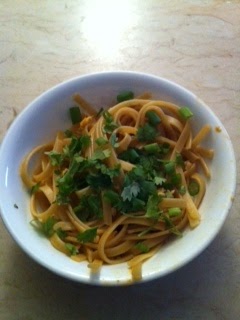
Dragon Noodles


This is one of my new favorite recipes!

It comes from Budget Bytes, one of my favorite websites for recipes!

Things I love about Dragon Noodles:

1.     Spicy
2.     Easy
3.     Cheap
4.     Did I say spicy?

When I make my dragon noodles I usually don't use the lo mein, I usually use half a container of fettuccine.  I rarely have lo mein hanging around my pantry but I often have fettuccine or other stringy pasta. 

You can easily make this a vegan recipe by using margarine instead of butter.  The recipe also calls for eggs but you could easily use egg beaters or tofu instead.
This may be one of the easiest pastas I have made in a long time!  And almost all of the ingredients come straight from your pantry!  (Stay posted for a post on keeping green onion around all the time!)

Monday, November 19, 2012

Spinach Burger

I'm not sure if I've shared my love of veggie burgers with you yet.  If not, I LOVE THEM.  They are they chock full of hidden vegetables to keep you healthy and super convenient to warm up when you are in a pinch.  And they are delicious (that's the most important part)!

The bummer of Veggie Burgers when you buy them at the store is that they can be quite pricey.  I don't know about you but I'm not a huge fan of pricey.  Store bought veggie burgers also tend to have non-nutritious fillers that aren't helpful for the health conscious.

The most recent veggies burgers I've made were actually spinach based.  The recipe comes from Better Homes and Gardens and it was so easy! I doubled the recipe so that I would have enough to freeze and take to work for lunch later on.

What else goes with burgers but fries?  I've been trying to make healthier choices and fries are often not on the healthy list.  Instead I decided to make cauliflower poppers as a fry substitute.  The recipe I used came from Delighted Momma and it was super easy as well! 

Add a Coke and you have the perfect vegetarian substitute for the classic burger meal!

Sunday, November 4, 2012

Start the Day Off Right

I love breakfast, but it's not often that I have the time to really put some effort into it. 

This weekend I was visiting my sister and we made a absolutely scrumptious breakfast that I just had to share with you.

Vegan French Toast with Fall Fruit Compote

Ingredients

4 slices white bread
1 cup almond milk
2 tblsp cornstarch
1/4 cup flour
1 1/2 tblsp cinnamon
1 1/2 tblsp vanilla
1/2 tsp nutmeg
1/2 tsp ground cloves
1/2 tsp allspice
1/2 a zested orange
Canola oil

Directions

Pour your milk into a large mixing bowl, add the cornstarch and mix until evenly distributed.
Add the flour and mix again, it's okay if it's a little lumpy.  Then add in all the spices.

Toast your bread lightly in the toaster so that it gets a light crunchiness to it.
Soak the bread in the almond milk mixture until it starts to get spongy.

Heat a large skillet on medium high heat with a light layer of canola oil on the bottom.
Cook each piece of bread for a few minutes on each side.  The bread should be golden brown on each side with flecks of dark brown.

We served our french toast with a pear, apple, and cranberry compote that my mom had made earlier in the week. 

Sprinkle a little powdered sugar on top and enjoy!

Wednesday, October 17, 2012

Parfait Please

It's fall y'all!  I love fall, it is my favorite holiday!  However, it is still quite warm down south. 

What's a southern girl to do?  I need my fall flavor fix, but it is far too hot for squash casseroles, cranberry sauce, and pumpkin  pie every day.

The answer! Make pumpkin parfaits for breakfast!

This recipe was inspired by Budget Bytes pumpkin yogurt parfaits.  Beth's parfaits were created as a dessert item, however I decided to turn mine around and make them a breakfast item.

Ingredients

Granola
Greek Yogurt
Unsweetened Pumpkin Puree
Cinnamon
Pumpkin Pie Spice

I don't have any ingredient amounts because I just eyeballed the ingredients based on my taste.  I used a dash of each spice, every time I used it.  For the filling I used about 1 1/2 tblsp each as I layered.

Directions

Layer each of the ingredients in whatever order you choose. 
I layered:  pumpkin
                cinnamon
                granola
                greek yogurt
                pumpkin pie spice
                granola
                pumpkin
                cinnamon
                granola
                greek yogurt
                cinnamon
                pumpkin pie spice


Next time I make this breakfast (probably tomorrow) I'll use less layers.   I got very full about 3/4 of the way through the parfait.


A note about granola.  In my grocery store there is a great bulk bin section with an amazing granola selection.  I don't eat a lot of granola, so I like to buy a cup or two at a time from the bulk bin so it won't go stale.  Much to my surprise, what did I see when I was trying to decide what sort of granola to get? Pumpkin Spiced Granola! Perfection!

Friday, October 12, 2012

Indian Fix

I LOVE Indian food.  It is a great culture to experiment with culinary wise for vegetarians.  The basis of most dishes are legumes which contain tons of protein and other healthy stuff we miss by not eating meat.  Tonight I made a Simple Lentil recipe from Anupy Singla's cookbook The Indian Slow Cooker.  It was delicious and one of the easiest dishes I've made in a long time.  If you love Indian food but don't always have the time to cook it, this cookbook is for you. 

In addition to my slow cooked lentils I made spicy roasted cauliflower.  This recipe is inspired by a curry cauliflower dish that I get at Whole Foods.

Spicy Cauliflower

Ingredients

1 head of cauliflower (broken into 1in florets)
1/2 red onion (diced)
1 1/2 tsp cayenne
1 tbls chili powder
1/2 tbls cumin
3/4 tsp garam marsala
3 tbls olive oil
1 tbls minced garlic
1/2 cup veggie stock
salt and pepper

Directions

Heat the oil, cayenne, chili powder,salt, pepper, and cumin over medium heat for about 2 minutes (or until you can smell the spices).
Add the red onion and garlic to the oil and saute for about 2 more minutes.  You want the onion to start to break down, it will begin to get translucent and soften.  Stir often to make sure the spices don't burn.
Once the onion has become fragrant add the veggie stock and cauliflower.  I added some salt and pepper to this step as well.  You want to continue to stir the cauliflower to make sure that the cauliflower gets coated with the onion/stock/spice mixture. 
Saute the cauliflower for about 3 minutes.  Once the cauliflower has started to soften mix in the garam marsala. 


In true Southern fashion I enjoy spicy food.  My Yankee family may think something they have made is spicy enough and I reach for the hot sauce.  These spicy cauliflower may be too spicy for you, or may not be spicy enough.  Adjust the seasoning to your liking!  The cayenne and chili powder give them a bit of heat, the cumin adds a little depth, and the garam marsala finishes everything off with a nice smokey flavor.

Take one of your favorite store bought recipes and recreate it at home! You can make everything according to your taste preferences and save a bunch of money along the way!

Monday, October 8, 2012

Make It Work

Sometimes you don't want to go to the store.

Sometimes you don't have any food in your refrigerator.

This is when you have to make it work.

Tonight I made a delicious baked pasta with the leftover ingredients from past made meals.

I may or may not have eaten half of this tonight.  It was that good!

Ingredients

8oz pasta
2 cups ricotta low fat cheese
1 1/2 cups marinara
2 tsp basil
salt and pepper
2 tsp Italian herbs
2 tsp dried oregano
1 zucchini
Mozzarella cheese

Directions

Cook the pasta in salted boiling water for around 9 minutes, or until the pasta is still a little bit chewy.

While the past is cooking preheat the oven to 350 degrees.

Mix all the rest of the ingredients together.  Adjust the seasoning to your liking. 

Once the past has cooked, mix it in with the sauce/cheese mixture. 

Pour the saucy pasta in a 8x8 baking dish and sprinkle with mozzarella.  Put the baking dish into the oven and bake for about 20 minutes.


I don't have any other pictures because I really wasn't expecting this dish to be so delicious!  When I made it I was just trying to clean out the fridge and avoid going to the store.  Who knew throwing these ingredients together would be so good!

Clean out your fridge and see what you can create tonight!


Monday, October 1, 2012

We Make Bread

or, The Little Things


I'm a big fan of happiness. I think everyone should be happy and that you can always find a reason for happiness. 

Happy people just don't kill their husbands. (teeheehee, if you don't get it YouTube that phrase with 'legally blonde')
Everyone has those little things that make us smile inside.  One of my things is making bread.  It is the perfect thing to get out my aggression after a long day or to savor some time to myself after being with small people all day.  And you get such a tasty, simple, and amazing product at the end of it.
I don't have a bread maker or a dough hook on en electric mixer.  I make all my bread from hand and that's the way I like it.  Making bread is usually a long process, at least two hours.  It's nice to take a break from the day and set some time aside for yourself. 

If you think you don't have time to make bread I tell you

WRONG

True, you do need some time to make bread.  But it's not hours spent in the kitchen working and kneading dough.  The actual hands-on time when making most bread is about 20 minutes, total time about 3 hours.  I do laundry, clean the house, plan lessons.  I like to pool all the things I have to get done during the rise time, that way when the bread is done all I have to do is enjoy it.

Basic Bread Recipe

This is a combination of several recipes I have used to make bread.  It's basic and super delicious.

2 TBLS butter
4 TBLS sugar
2 tsp salt
2 TBLS active dry yeast
1 1/2 cup hot water
5 cups + all purpose flour


Add all the ingredients except the flour in a small bowl, mix, and allow to sit for 5-10 minutes.  This allows the yeast to start to ferment.  You'll know it's ready when there is a blooming of different colored stuff in the middle of the bowl.

After the yeast has started to ferment, you will start adding the flour in.  Add around 3 cups first, stir it all together and then slowly start adding more flour about 1/2 cup at a time.  Soon you won't be able stir it with a spoon and now it's time to get your hands dirty. 

Wash your hands then have at it!  Generously flour your counter, plop the dough onto the counter, flour your hands, then start to knead the dough.  Keep adding flour until the dough isn't sticky anymore.  You'll need to knead the dough for around 10 minutes, until it reaches a non-sticky doughy state. 

Once you are done kneading the dough; grease a large bowl and put the dough in it.  Allow the dough to rise for about two hours or until it has doubled in size.  Punch it down, then separate it into two balls.  Round each ball and place it on a cookie sheet.  If you want to, you can cut fun designs into your bread at this point.  Allow the dough to rise for another 1 1/2 hours to 2 hours. 
 
(At this point, if I were you, I would preheat the oven)

The bread should rise to about half the size you want them after they bake.  If you want to rush this process you can set your oven on around 175 degrees and allow the bread to rise in the heating oven.

Once your dough has risen to the height you want it paint it with an egg wash (egg whites and water mixture).  You can also add spices to your bread at this point.  My favorites are kosher salt and fresh rosemary. 

(If you are going to use fresh herbs, make sure you press them into the bread so they don't fall off when you start cutting into your delicious treat)

After you top your bread with extra specialness, pop it into a 400 degree oven for around 30 minutes.  I don't want to tell you specifics because every oven is different..  Adjust the degree and time based on your oven particularities.

You know your bread is done when it starts to brown around the edges and on top.  You should also be able to smell it while it cooks at this point.  Let it cool for about 15 minutes on a wire rack, then behold your marvelous baking prowess!

Serve with favorite soups, salads, or eat it on it's own!  I usually just eat it on it's own, it's almost too good to dunk into other flavor profiles. 


Eat and Enjoy!  I hope making bread brings you as much peace, joy, and fulfillment as it does me!

Friday, September 21, 2012

Party Time

A True Southern Girl

A good friend of mine had a party last weekend.  What is a good southern girl to do but find something to bring?  My mother taught me well, when you are invited to a party you must contribute.  Whether it's a something to drink for your own consumption, a bottle of wine for the host, flowers for the host, or something to contribute for the party itself it is impolite to show up to a party empty handed.

The host of the party is providing the space, will be cleaning up after you leave, and is probably providing a large amount of food and beverage for you.  The most you can do is help the host out.  For the party I attended I knew the host was providing beverages and that the host's girlfriend was preparing some savory snacks for everyone to enjoy.  I decided to do a sweet snack that everyone could partake in to balance out what I knew would be there. 

I decided to make some toffee bark.  If you've never made this before, it is one of the simplest and best party foods I've ever had.  The first time I had this candy was at the hands of my grandmother who had made it for a tailgate several years ago.  When I made it last weekend I couldn't help but think of her.

All you need for the toffee bark is:
1 sleeve of Saltine crackers
1 bag semi-sweet chocolate chips
equal parts butter and
brown sugar

First preheat your oven to 375 degrees Fahrenheit.
Next, melt the butter and brown sugar together on the stove top. 
I used a stick of butter and half a cup of brown sugar, but if you prefer your toffee darker you can certainly add more brown sugar.
Bring the butter/brown sugar combination to a boil then lower the heat and simmer for 5-6 minutes until it thickens considerably. 
While the butter and brown sugar are boiling, line a 9x13 baking dish with aluminum foil.  After the foil is in place, line the bottom of the baking dish with Saltine crackers.
Once the butter/brown sugar (now referred to as toffee) has thickened, carefully pour it over the crackers in the baking dish.  I used a spoon to make sure the mixture covered all the crackers. 
Put the mixture in the oven and cook for around 5 minutes, until the toffee starts to bubble.
Once the toffee is bubbling, take the baking dish out of the oven and set it on your stove top.  Now take the chocolate chips and pour them onto the crackers and toffee. 
The heat from the crackers and toffee will melt the chocolate chips (but if you are impatient like me you can pop the whole mixture back in the oven for 3-4 minutes until the chocolate melts).
Make sure the chocolate has covered the whole mixture, then let it set.  The whole mixture needs to harden, so if you are in a rush you can put the baking dish in the freezer or fridge.
Once the mixture has hardened, you can pop it out of the aluminum foil and break it into small pieces to serve.

Since the mixture needs to harden to serve, this is the perfect something to make ahead of time!
You can put the pieces in a adorable serving dish and present to your host with a smile and 'thanks for having me!'

Quote from the evening: 'We don't play by those Yankee rules here!' In reference to different undergraduate rules for beer pong.

(yes, this really happened)

Saturday, September 15, 2012

Make Ahead

Make Ahead Meals


I never thought I'd be one of those people who stocked their freezer with meals in Tupperware, wrapped in aluminum foil, or tucked into corners to pull out whenever I wanted.

Let me tell you, I'm glad I was wrong.

Last week I made the Veggie Burgers from The Homemade Pantry, they were time consuming and a little frustrating to make. But the work was well worth the product.  I know have a freezer full of veggie burgers I can pull out at a moment's notice when I haven't been to the grocery store (guilty) or don't feel like cooking (guilty again). 

This week I'm going to tackle freezer breakfast burritos from Budget Bytes.  I need a good breakfast to get me through my busy morning teaching and these look like they will fit the bill perfectly.  Anything I can make ahead so I can get a few more minutes to sleep in I'll take. 

Having delicious homemade lunches, dinners, or breakfasts at your fingertips isn't the only reason to keep make ahead frozen meals in your freezer.  The more full your freezer is, the less energy it takes to keep everything frozen.  The less energy it takes, the cheaper your energy bill is at the end of the month.  The cheaper your energy bill is at the end of the month the less fossil fuel you use.

It's a win win!

Stay tuned for an update on the breakfast burritos!

Wednesday, September 5, 2012

Luxury Cooking

I love being able to set aside an entire night to cook a delicious meal.  It somehow seems like a luxury to be able to spend 2 hours cooking dinner with no distractions.  Tonight I made eggplant parmasean, spaghetti squash, and roasted cabbage.  DELICIOUS!!!!!

Here is what I did:

Spaghetti Squash


(I promise I'll get better at food photography)

Let me just say, I love spaghetti squash!  It is a delicious and healthy alternative to pasta if you are looking for a less traditional meal.  If you don't know how to handle a spaghetti squash this is an awesome video to get you started http://www.youtube.com/watch?feature=player_embedded&v=mPFErHz6zOM.

After I finally got all of the seeds out of my squash (only difficult art of the cooking process) I decided to mix in about a quarter of  a bunch of parsley, dash of salt, dash of pepper, and the juice of one lemon.  Number 1 delicious dishl!

Eggplant Parmesan


(Not the prettiest food, but scrumdidleyuptious)

I have been craving eggplant parmesan lately something fierce.  I love eggplant parmesan because it isrich and full of flavor, however, I would like mine without the whopping calorie count please. I followed Gina's Skinny Taste recipe with a few tweeks of my own.  Here is the original recipe http://www.skinnytaste.com/2009/03/lighter-eggplant-parmesan-5-pts.html

For my eggplant parmesan I didn't use the Pecorino Romano, and you know what? I couldn't tell the difference! The ricotta adds such richness, creaminess, and saltiness that the missing Pecorino Romano didn't seem to be missing at all.   I'm always looking to cut a few calories here and a few calories there, so this was an easy to change to make a healthy recipe even healthier.

The other difference that made this eggplant parmesan difference from others I have made is that I used homeade tomato sauce.  The recipe comes from The Homeade Pantry: 101 Foods You Can Stop Buying and Start Making.  I received this book recently, and if this recipe is any indication of the quality of the rest of the recipes in the book I can't wait to cook them all!  Here is a link to buy the book if you want to start stocking your kitchen with delicious homeade delicacies.  http://www.amazon.com/The-Homemade-Pantry-Buying-Making/dp/030788726X

Lemon Roasted Cabbage

(This was taken from the website, that's why it's prettier)

I had pinned this recipe a long time ago and I'm so glad I finally got around to trying it!  Here is the link to the recipe http://www.kalynskitchen.com/2010/03/recipe-for-roasted-cabbage-with-lemon.html.  The only caution I would give is to be very careful when turning the cabbage over while roasting.  To help with the process I would keep the ends of the cabbage intact until after cooking.  By keeping the hearts intact the leaves will stay attached, this will make the flipping process much easier.


A Note

Since I had all night to cook without worrying about feeding anyone else, no meetings to go to, nothing to rush me at all I took my time with this meal.  I am sure that it wouldn't take 2 hours to cook this meal if you planned your time a little better.  The sauce can be made ahead of time, and if you have a large oven (I do not) then you could roast several vegetables at once.
Web Analytics